| Board 07 Wed 25 June 2025 |
Show Detail |
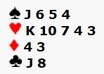
3NT or 4M?
You've got a balanced 16-count - 1NT is out, then - so which of your two equal-length suits do you open? This is the rule:
With two equal length suits, you always open the higher-ranking suit, except when you have exactly 4 hearts and 4 spades, in which case you open 1♥.
You're holding the exception, so you open 1♥. And this deal's a great example of why you do: it makes it so easy to find a major fit, if there is one. Partner responds 1♠ and that's you in a spade fit. Job done. It remains only to decide how high to go. With a 16-count (that's one of the two 'extra Kings' needed for game *) you can raise her to 3♠ , and with 12 points (she's got the other 'extra King' and more!) partner will raise you to game: 4♠.
Other auctions
4♠ looks like a no-brainer on this holding, but it won't be the case at all tables. The trouble is that - per trick - no trumps scores slightly better than a major suit (the 7th trick is worth 40 rather than 30), and sometimes you'll make as many tricks in no trumps as in the major suit, and in those cases 3NT will get you a better score.
On this hand, if NS are playing a strong no trump (15-17 instead of 12-14), South will open 1NT ... and North, despite her 4 spades, might think 'I'm a flat 4-3-3-3 and we might do better in 3NT, so I won't bother with Stayman - I'll just punt 3NT'. Which is probably how two of the tables on the posh night got to 3NT instead of 4♠.
Just looking at the combined NS holding, which looks the better contract to you?
4♠ vs 3NT
4♠ looks pretty good. You're going to lose a trick to the ♠A and a club trick - and maybe a heart trick if the ♥K is with West. So that's 10 tricks, or 11 if the heart finesse works.
3NT, on the other hand, looks very dodgy on a club lead. They can knock out your ♣A and then when you let them in again with the ♠A they can bang out their club winners. And on top of that, you also need two tricks in hearts, and if the heart finesse doesn't work you're going off ... Yuk.
(This is the great advantage of being in a suit, of course: not only are you not worried about the opps making lots of club tricks, but you can actually ruff the 3rd round of clubs for an extra trick!)
Take a look at the whole deal. The ♥K is right, so you can make 11 tricks in 4♠. In NT it's trickier, against the best defence (ie the lead of ♣K), but if you duck the clubs twice, East will not have any clubs left when she comes in with the ♠A, and you can make 10 tricks. As expected, then, not as good as 4♠.
Surprise!
So you may be surprised to see that on the posh night, the 6 declarers making 11 tricks in 4♠ scored a joint bottom, because the two declarers in the inferior 3NT contract both made 12 tricks. How come?
Well, West led the wrong club. With ♣KQ109x, West should lead the ♣K. If she leads the ♣10 (top of the lower sequence) or the ♣9 (4th highest), South simply lets the lead come round to her ♣J, which wins the trick. Now she can force out East's ♠A, while still having a club stop, and can take the rest of the tricks. Guess what the leads were against the two 3NT contracts? The ♣9 and ♣10.
Conclusion
The odds are that an ordinary 4-4 major fit with (say) 25-29 points will take more tricks in the suit contract than in NT. I don't know the exact odds, but they're likely to be at least 2:1.
So, bridge being a probabilities game, it's a no brainer to prefer the major fit to NT. Here's an analogy:
You're playing the game Find the Ace: there are three cards, one of which is an Ace. The cards are shuffled randomly, and are divided into (a) a single card on one side and (b) two cards on the other. Which do you choose to give you the best chance of finding the Ace: (a) or (b)? Well, 2 times out of 3, it'll be (b). So go for (b). Every time. Sure, you'll lose one time in three (along with a lot of other sensible bidders - so a shared loss), but most of the time you'll be the winner. As the 4♠ declarers on this hand should have been. They were in the best contract, and they just got unlucky.
cj
* The 'two extra Kings' idea came up in the Basic Bidding Themes 5 article, which I emailed to AP players earlier this year. If you didn't get it, I can email it to you.
|
|
|
|
| Board 09 Wed 18 June 2025 |
Show Detail |
An open book
Responding 2NT to partner's opening 1♣/1♦/1♥/1♠ to show a 'balanced 10-12 points' is pretty well always a bad bid. If you haven't got a fit with partner, you're sure to have a suit of your own, and with 10+ points you have enough points to show it, even if it has to be at the 2-level. So bid it - don't hide it with a daft 2NT bid that probably prevents partner from making her preferred rebid. *
On this hand, without East's interference, your best response would be 2♣. But East's 2♠ overcall (6 cards, weak, just the same as an opening weak 2) changes everything. For a start, she's already taken away a lot of your 'chatting space', so you need to invent something. And for another, your two stops in spades (assuming East is holding the ♠A) make NT the most likely destinataion - in which case you can happily ditch the idea of a diamond contract. Just as before, 2NT shows a balanced 10-12 points, but now it's also showing at least one stop in spades. East's overcall has turned a poor response into a very good one, which makes it easy for your partner to find the right game.
The play
OK. You're in 3NT, West leads the ♠8, North goes down as dummy, East wins the trick with the ♠A and leads a 2nd spade. What now?
Well, the one thing you have to do is to set up your diamonds, which will necessarily involve losing the lead to whoever holds the ♦A, so you must do that now, while you're still safe in spades. You lead a small diamond to the ♦K ... and this loses to East's ♦A. East leads a 3rd spade and you're back in hand.
You can now count 8 tricks: two spades, four diamonds and your two aces: ♣A and ♥A. For your 9th trick, then, you're going to have to take a finesse, either in hearts or clubs. Which will you choose? Does it matter?
No, it doesn't matter in the slightest. The rest of the tricks are yours. How come?
Well, East's jump overcall was a weak two, showing 5-9 points, and she's already shown up with two aces. So she can't have either the ♥K or ♣K as well. West must have them both.
You can confidently run your ♣J, then a small club to dummy's ♣Q, then come back to your hand with a high diamond, and run the ♥Q. Nothing can stop you making 11 tricks, as you'll see if you check out the whole deal.
Things to take from this hand
- Without interference 2NT would be a poor response to partner's opening 1♦, but East's overcall transforms it into a excellent bid.
- Take the auction into account when planning your play - it can tell you an awful lot about the defenders' hands.
- Under normal circumstances you'd be nervous about finessing either hearts or clubs - because if either loses, East - the 'danger hand' - will be able to cash her remaining 3 spades, but on this hand you can't lose.
- Don't bang out all your diamond winners just because you can. You'll be wanting to use a diamond later on to get back to your hand to do some more finessing. Get that out of the way first, and then you can bang out winners galore.
On the night
On the posh night, 4 pairs were in 3NT, two were in 4♦  and one went off in 6NT. All but one pair made 11 tricks. and one went off in 6NT. All but one pair made 11 tricks.
In AP, no one was in 3NT. Most were in a diamond part-score - all making 11 tricks - one went off in 5NT and one East went 2 off in 3♠.
cj
* I was intending the next AP email to be on that topic, but maybe that's not necessary now.
|
|
|
|
| Board 14 Wed 11 June 2025 |
Show Detail |
Insisting on a major
Here's a hand with some interesting features in both bidding and play.
Sitting North, you were planning to open 1♠ but West's opening 1♦ gives you the opportunity for a more descriptive bid: a 1NT overcall, showing a balanced hand with at least one diamond stop and 15+ points.
Your partner is now pretty sure that game is on in one of the majors (you should have at least 3 in at least one major for your bid), so it's just a question of finding out which is the best one. We've seen in an earlier HOTW that 'systems are on' after a 1NT overcall - meaning that partner can treat your bid as an opening 1NT, so that transfers and Stayman are available.
So here, she'll transfer you into spades, and then bid hearts (promising at least 5-4 in spades and hearts) ... and if you still insist on being in NT, she can now bid hearts again (now promising 5-5), forcing a major game.
As it happens, you're quite happy with a 9-card spade fit, so show your preference for spades (only at the 3-level, as you're a minimum for your bid), and with just 6 losers partner will waste no time raising you to game.
The play
The lead will probably be the ♦5, East leading her partner's suit. You will win and probably decide to continue with your second top diamond and discard a club from dummy, reducing your possible club losers to just one.
That out of the way, how are you going to attack trumps? Missing both the ♠K and the ♠J, your normal play would be to cash the ♠A first (in case the ♠K is singleton) and then lead low towards dummy's ♠Q, hoping for East to hold the ♠K. East is known not to have many points, but it's worth a try. So you cash your ♠A ... and West drops the ♠K - lovely! What now?
Well, you now have something called a 'marked finesse' - you know that the ♠J9 are with East, so you can pick up both of her trumps. And, as you can see if you look at the whole deal, you'll end up losing tricks to only the ♣A and ♥K.
Things to take from this hand
- Don't forget the 1NT overcall: it's a great way of giving a good snapshot of your hand, showing a balanced 15+ count with stops in the opponent's opening suit. In addition ...
- Systems are on after a 1NT overcall, meaning that you can use transfers and Stayman - just what you need here for finding your major fit.
- With Axxx(x) opposite Qxxx(x), cash the A first, in case the K is singleton, then lead low towards the Q.
- What a pity you don't know at the start that what East's actually holding is the ♥K. Then you can finesse a heart at trick two, and later finesse hearts again, ending up with 12 tricks instead of 11.
On the night
On the posh night, everyone was in game (one in 4♥ and the others all in spades). Six declarers made 11 tricks, the other two 12.
In AP, five Easts were in 4♠, and the other two stopped in a part score. Four made 11 tricks, the other three just 10 - I wasn't there, but suspect that some declarers didn't cash their ♠A first.
cj
|
|
|
|
| Board 09 Wed 04 June 2025 |
Show Detail |
Almost there!
What does it mean when your partner opens 2♣? It shows a strong hand (lots of points, nothing to do with clubs!) which doesn't need much from you to be worth game, and may even be worth game without any help from you at all. To all intents and purposes, then, it's a game-forcing opening bid. It comes in two basic flavours:
- a balanced (so no-trumpy) hand with at least 23 points (ie too strong to open 2NT) OR
- an unbalanced hand - still with lots of points - which has at least 9 'playing tricks' in a suit.
In either case, you won't need much - if anything - to ensure that game is made.
Responding to a 2♣ opening
There are all sorts of different systems, but the simplest and possibly best is to respond 2♦ (nothing to do with diamonds!), which simply means 'Tell me more, partner.' Then when partner responds (eg 2NT or 2♠), you'll know which 'flavour' of hand she has. And then you can take it from there.
One of the reasons for the 2♣ opening is to make sure you don't get passed out. Here you've got a pretty 'rubbish' holding and if partner had opened 1 of anything, you'd have passed. Instead you'll be bidding 2♦ and waiting for partner's next bid ...
- Supposing she now says 2NT. What do you do now?
You raise her to 3NT. Your 3 points make the joint holding at least 26 points - enough for game.
- What if she says 2♠ (which in this context will guarantee at least 5 spades)?
Well, if partner's got 9 tricks in her own hand, you've got to be worth one more: you've got a fit in spades, and you'll either be making a trick with your ♦K or else ruffing a club. Bid 4♠. *
But what if I've got nothing at all?
Let's say that your ♦K is instead the ♦10 - nul points. Well ...
- Over the 2NT rebid, you pass. You know you haven't got enough for game. This is pretty well the only situation in which you can pass opener's second bid. (If partner had 25+ points, she'd have rebid 3NT instead of 2NT.)
- Over 2♠ you can't pass, because you don't know whether partner's strong enough for game without any help from you. Instead you bid 2NT. In this situation, 2NT is a 'second negative' and it means simply 'Partner, I have nothing at all - from now on I'm passing!' And your partner can then decide whether to go to game or not.
What happens here?
Take a look at the whole deal. Partner's going to rebid 2♠ and you've raised to 4♠. Let's say South leads a heart.
As it happens, your ♦K isn't needed, but your ♣10 ensures an overtrick. When you cash your ♣A South drops the ♣Q so all you have to do is lead a small club to dummy's ♣10 and you end up losing tricks only to the ♣K and the ♠Q.
On the night
On the posh night, all but one EW pair were in 4♠, all making 11 tricks.
In AP, four Easts were in 4♠, one was in 1♠ (didn't open 2♣) and two were in 2♠ (did W pass E's 2♠ rebid?). 4 made 11 tricks, the others 9 or 10.
cj
* This jump straight to game is something we've seen before: it's called fast arrival and it means 'OK partner. You want to be in game. Fine. I'm putting you in game - but I'm not interested in going further.' Raising partner instead to just 3♠ is a different ballgame altogether: it's stronger and shows an interest in a slam. Beyond the scope of this modest HOTW.
|
|
|
|
| Board 02 Wed 28 May 2025 |
Show Detail |
Improvise!
You can get through a whole course on bidding and up comes a hand like this that simply doesn't fit. If your partner had opened any suit other than clubs, you could simply reply 2♣ ... and once partner's made her rebid, you'll know whether you want to go for game in NT or a suit.
But she's opened 1♣, which gives you a problem. You've got game-going points, but you don't know yet which game you should be in. Sure, you could punt 5♣, but what if you can make 10 tricks in NT? or if you can make 6♣? If you bid 3NT yourself, partner will probably pass ... and what if 3NT goes off and you should have been in clubs all along? How to find out more about partner's hand before committing yourself?
What you don't do is bid 3♣. This promises 10ish points and at least 4 clubs, but it isn't forcing. Partner can pass it. Which would be disastrous, as you're a whole Ace stronger than that and you have to be in game.
So how to make partner bid again? You'll just have to improvise. How about bidding a suit? That'll force her to make a second bid. Bid 1♦. Sure, you've only got 3, but you can always revert to clubs later if necessary ...
What can happen?
You can work out in advance how you'll react to partner's second bid, whatever it is.
- If she simply rebids 2♣ or raises your diamonds, you could punt 5♣
- if she says 1♥ (promising 5 clubs and 4 hearts) you'll probably do the same: 5♣.
- if she says 1♠, promising something in your weakest suit, you can bid 3NT, which will probably score more than 5♣.
- if she rebids 1NT, you can likewise raise to 3NT.
- and if she jump rebids her clubs (showing 6 good clubs and 16-18 points), you're probably looking for a slam ...
What does happen?
Take a look at the whole deal. After your 1♦ bid, most Souths will probably rebid 1NT, in which case you can raise to 3NT. End of auction. And if she rebids a rather flaccid 2♣, you'll prefer 5♣.
If she stretches a little and jump rebids 3♣, you might be tempted to go higher, but sadly both 6♣ and 6NT go one off.
On the night
On the posh night, 4 Souths were in 3NT, two in 5♣ - all making - and one pair went one off in 6NT. Note that 3NT scores way better than 5♣, as there are two overtricks for the taking.
In AP, one pair was in 3NT, making 11 tricks. two were in 5♣, one was in 6♣ (making 13 tricks!) and one pair languished in 3♣ (it probably went 1♣ - 3♣ - Pass).
Points to take from this hand:
- Most importantly, don't raise partner to 3♣. It's an underbid and partner can pass it, in which case you've missed a game: see above.
- If you have to improvise a bid, make it 1♦, not one of the majors. If you bid a major, partner will take you at your word and might leap skywards in the major that you haven't got. If you bid the minor, she'll instead look for a NT contract.
- Many experienced players play something called 'inverted minor raises', which are great in situations like this. It's not basic bidding, but in case you're interested there's a quick outline below.
cj
Inverted minor raises
This is a convention designed for situations like this - ie when partner opens 1 of a minor and your only suit is that same minor. In other words, you don't have as many as 4 of any suit other than that minor. Essentially, it turns your responses upside down. Let's say your partner's opened 1♣:
- If you're weak (6-9 points), you raise not to 2♣ but to 3♣. This has a preemptive function - to get in the way of the opps finding their likely major fit.
- If you're stronger (10+ points), you simply raise to 2♣. This is forcing, and allows you both to show features (ie stops) in other suits. If that works, you end up in NT. If not, you revert to the minor.
How would that work on this hand? Well, N will reply 2♣ to S's opening 1♣. S will now bid 2♥, showing her heart stop (and denying a diamond stop), and North will bid 3♦, showing a diamond stop but denying a spade stop and also showing enough strength for game. And with ♠AJ S can now bid 3NT. (Without the spade stop, she'd have to say 4♣ instead, which N will raise to 5♣.)
|
|
|
|
| Board 14 Wed 21 May 2025 |
Show Detail |
Forcing an entry
You've got off to a good start by getting into a great game contract. You made a weak jump overcall over East's opening 1♣, and in spite of your weakness, your partner rightly reckons you're worth 10 tricks in spades: they won't be making any club tricks, you have a 10-card trump fit, and she has excellent values in the other two suits as well: so 4♠ it is.
West leads a small club. What's your plan?
A question of entries
Where are your 10 tricks coming from? You have 6 spade tricks, plus the ♣A and ♥A: that's 8. All you need, then, is a couple of club ruffs in dummy and you're home. And you never know, you might make a diamond trick as well.
The difficulty is that to ruff two clubs you need to get to your hand twice, and the only entries you have are trumps. Fast forward it and see what happens. Trump to your hand and ruff a club; another trump to your hand ... and your second club ruff has to be with the ♠A. Which will leave you in difficulty if the ♠J53 are all with one opponent. Is there a better way?
Yes. You can create an entry to your hand either by leading a little diamond at trick 2 or the ♥A and another heart. Now you have a void and can get to your hand whenever you like by ruffing instead of leading a trump.
Let's say you lead a little diamond at trick 2. Take a look at the whole deal and see how it goes.
- West wins and leads (say) a heart.
- You win with the ♥A and ruff a diamond.
- Ruff a club and return to hand with a 2nd diamond ruff.
- Ruff a second club and ruff another diamond (East can't ruff and even if she could you can overruff)
- Now you can ruff a third club ....
... and it must be time to start clearing trumps. Cash dummy's ♠A and exit dummy with a heart. East wins the trick, but you're left with just the ♠KQ so take the remaining two tricks. That's 11 tricks to the good guys. *
On the night
On the posh night, all sorts of things happened. There were people in 3♠, 4♠, 5♠ and 5♠X; not many made 11 tricks. The rest were all in 5♣X and 5♦X! Some went just 2 off for a good score (-300), but if you go 3 off it's too expensive (-500).
In AP, two pairs were in 4♠ and one in 3♠: all three made 11 tricks. Two Wests sacrificed in 5♣X, and one West was allowed to get away with 3♣ making!
Points to take from this hand:
- Bid to game! North's values are all in the right places, and as we've seen you can make 11 tricks with just 21 points between you.
- This is one of those hands where you go off if you clear trumps straight away. You have to get your ruffing done first and then clear trumps.
- If you haven't got an entry to hand, create one: don't be frightened of losing the lead. What can they do to harm you? A club is playing into your hands. As is a diamond. If they lead a heart, you just win the trick and get on with it - as above. And you can even stand a trump lead: just win the trick and get on with your cross-ruffing.
cj
* ♥A and another heart works just as well, except that instead of taking 3 club ruffs you can create a trick with your ♦K instead: lead low towards the ♦K and West has to win with the ♦A. Then next time you're in dummy you can discard a club on the ♦K, so you can make do with just 2 club ruffs instead.
|
|
|
|
| Board 03 Wed 14 May 2025 |
Show Detail |
Double chance
South opens 1NT and you don't much fancy your partner's 2♥ overcall, so with a decent opening hand yourself, you overrule her with 2♠ (Sorry, partner, I think this'll work out better in my suit rather than yours) and everybody passes. South leads the ♥7 and when you see dummy you wonder whether you should have tried for game ... but then you remember that it was South who opened 1NT, so the club and spade honours are likely to be not where you'd like them to be.
That said, you'd still like to make as many tricks as possible - so what's the plan?
Two good lines of play
One is pretty obvious: you're probably only going to get to dummy once, so while you're there, you might as well cash all three of your heart honours, ditching a little diamond and a little club from your hand. * That's two possible losers out of the way, then.
Once that's done, you'll want to attend to the trumps. But how best to play them? With this holding, you'd usually take advantage of the fact that you're in dummy and lead a small spade, finessing the ♠Q. Then if that works and the trumps are split 3-2 (likely - see * below), you'll lose just one spade trick to the ♠10 or ♠J. The trouble is, it's probably not going to work, because South (the 1NT opener) is much more likely to hold the ♠K than North.
Instead of taking the finesse, there is another possibility, which is based on the hope that the ♠K is in a doubleton: cash the ♠A and then lead a low spade ... and if the ♠K started in a doubleton, it'll now appear, leaving your ♠Q to drop the opps' final trump honour. It's not that likely, but on this auction the odds are at least as good as the finesse. **
As it happens - take a look at the whole deal - the 'doubleton gambit' works: South plays the ♠J on your ♠A and then (joy!) has to go up with the ♠K on the next trick. Just one spade loser instead of the two you'd lose via the finesse.
On the night
On the posh night, everyone was in spades, making 9, 10 or 11 tricks. Only one pair bid game.
In AP, all but one were in spades, making 8, 9 or 10 tricks. No one bid game.
Note Making 11 tricks is much easier if South leads her ♣K instead of a heart (as happened 4 times on the posh night). That way you end up with only 1 club loser.
cj
* The opps' 7 hearts will split 3-4 more than 60% of the time, so the odds are that your 3rd round of hearts won't get ruffed. On which subject, here's a handy and easily remembered tip:
- If you're missing an odd number of cards in a suit, it's likely to split kindly for you: so 4-3 is more likely than 5-2; and 3-2 is more likely than 4-1.
- If you're missing an even number of cards in a suit, it's not so good: 4-2 is more likely than 3-3 and 3-1 is more likely than 2-2. (The exception is when you're missing just two cards: 1-1 is slightly more likely than 2-0.)
** The 'doubleton gambit' can also be the best line if you hold something like: Axxxx opposite Qxx. Here the finesse is to lead low towards the Queen, hoping the King is in the right place. If that's unlikely (or impossible) on the auction, cash the Ace, then play low from both hands, hoping the King will appear.
|
|
|
|
| Board 06 Wed 07 May 2025 |
Show Detail |
They took my bid away
Only 26 points between you, but if the trumps behave themselves, you're going to make all 13 tricks. How to bid the slam is one question, but the main thing to make sure you don't miss game!
What happens here comes up time and time again: partner opens the bidding, you have your response ready ... and your RHO gets in the way. On this deal you were going to respond 1♥, but the opp's 1♠ puts paid to that. What to do? Upping your response to 2♥ is OK in theory, but for that you should ideally have at least 5 hearts and plenty of points (2♥ is higher than 2♦, and so prevents your partner from simply rebidding her opening suit). You've got the points, but only 4 hearts, so what now? The answer - and this comes up week in week out - is the negative double. This bid isn't necessarily strong - you just need enough points to respond, say 6+ - and it promises at least four cards in any unbid major. Here it means simply 'I would have responded 1♥ if they hadn't interfered.'
So South's rebid will be what she would have said if partner had responded 1♥. And with a 4-4 heart fit, a void in the opps' suit and just 5 losers, she'll go straight to 4♥.
If anyone should be thinking of the slam, I think it should be North: the EW bidding suggests that they have 9 spades between them, leaving partner with exactly none, so pretty well all partner's points will be in the minors, which is exactly where they need to be, and if she's strong enough to go straight to game, well ... but that's another story. *
As it happens, as you can see if you look at the whole deal, 13 tricks is a doddle: you ruff the opening ♠A lead, clear trumps, cash 6 diamond tricks and the ♣AK, and ruff a your last little club in dummy for the 13th trick.
On the night
On the posh night, 7 of the 9 tables played in 4♥, all making 13 tricks. No one found the slam, one pair stopped in 3♥ and one other went off in a rather odd 3NT.
In AP, three pairs were in 4♥ making 13 tricks; one found the slam (!) but made only 12 tricks; and one stopped in 3♦.
More on the negative double
The negative X is a way of responding to partner's opening bid if there's an overcall in between. It promises:
at least enough points to respond (so 6+, but could be a lot more) and at least 4 cards in any unbid major
As the North hand happens to have four cards in both majors, X is actually the best response whatever suit West overcalls.
What if West overcalls 1♥ instead of 1♠?
This creates a similar situation, but one that's different in one crucial respect: the overcall hasn't taken your bid away - you can still bid 1♠. This gives you a neat way of telling partner more about your hand: if you have just 4 spades, you double, as above, but with 5 or more spades you bid 1♠. Here, then you'd X, showing partner exactly 4 spades.
What if West overcalls 2♣ instead of 1♠?
Again, X is the perfect response: neither major has yet been bid, and you have both of them, so you can tell partner about both of your majors in just one bid.
You need to have the negative double in your bidding armoury: see below for links to other HOTWs on the subject. **
cj
* Blackwood 4NT will reveal South's two minor Aces, then 5NT the two minor Kings ... looking good for 12 or even 13 tricks!
** You can find two further HOTWs on the negative double here. They are: Negative double (Oct 2015) and It's that negative X again (June 2016)
|
|
|
|
| Board 14 Wed 30 April 2025 |
Show Detail |
Just three tricks away
Sitting West, you're declarer in 3NT, after an unremarkable but useful auction. Your 2NT rebid, besides denying 4 hearts, promises 18 points and while it isn't forcing to game (as partner might only have 5 or 6 points) it's clearly very encouraging, and with 8 points, East will go to game. Rather than simply raising you to 3NT, though, she rightly repeats her hearts - 3♥ - just in case you have 3 hearts and would prefer to play in 4♥. With only 2 hearts, you plump instead for 3NT. An unremarkable auction, then ... apart, that is, from North's puzzled / cross / surprised - take your pick! - reaction when you opened the bidding with 1♦. What do you make of that? Yeah, me too.
Planning the play
Sure enough, she leads the ♦A, then switches to the ♣J and it's time to make a plan. How many top tricks do you have and how many do you think you're going to make? How?
The answer's simple: you have 8 and will actually end up with 10. Where do the extra two tricks come from?
Simple. Still holding the ♦J1098 and with the ♦A already gone, you will eventually come to two diamond tricks to add to your existing 8 top tricks. It'll involve losing the lead twice, but that's fine: you still have two stops in each of the other three suits, so can survive anything they throw at you. So win the club trick, lead a diamond, win the return, then another diamond ... and the rest of the tricks are yours.
Sure, another way forward is to hope that the clubs split 3-3 (which as it happens they do), but that 36% chance only brings you up to 9 tricks in any case. Going for the diamonds is miles better - 10 tricks instead of 9, and a 100% chance instead of 36%.
Take a look at the whole deal. Weird, eh?
Tricky bidding for North and South
North It's always a bit surprising when the opps open your best suit, as happens here, but it's not that unusual. With a more balanced shape and two or three more points, North could have made a 15-17 1NT overcall over West's 1♦, but the general rule is that when the opps open your best suit, simply pass in tempo with not so much as a twitch to give the game away. If partner shows points you can always come into the bidding later.
South Points, as it happens, are exactly what South doesn't have. And galling though it must be to pass with a 7-card major: on this deal, pass is surely the best option. A preemptive 3♠ by South will get doubled and go 4 off for a very nasty -800.
On the night
On the posh night, 8 of the 10 EW pairs were in 3NT, nearly all making 10 tricks. One EW somehow managed to stop in 3♦, making 10 tricks - the same 10 tricks they could have made much more profitably in 3NT. And one NS pair turned the tables and somehow ended up in 3NT themselves: they were duly doubled and went 5 off for a hefty -1100. No one was in spades.
In AP, most EW pairs were in 3NT, mostly making 10 tricks. Sadly two pairs languished in 1NT (meaning that West didn't count her points before rebidding!) and two declarers only made 9 and 8 tricks.
cj
|
|
|
|
| Board 13 Wed 23 April 2025 |
Show Detail |
X-ray vision
No trumps contracts are usually something of a race: can you set up enough tricks in your suit(s) before they can get rid of your stops in theirs. In this contract you have both minors and they have both majors. Fortunately you have two stops in each of their suits but care is needed ...
West leads the ♠6 against your 3NT contract and (perforce) you win the trick. Right. You have only 6 top tricks and therefore need to set up 3 more. It's pretty clear that you can only lose the lead once: the opps will waste no time getting rid of your other spade stop and then if you lose the lead again it's curtains. Ignoring the auction for the moment, the question is, which suit do you develop first, clubs or diamonds?
The answer is clubs. The diamonds will work out fine provided the finesse succeeds AND the diamonds split 3-2, but if the finesse fails you're in trouble: you now have 3 diamond tricks, but that still only makes 8 tricks in all. Back comes a spade. That's you with no spade stops left. And now, for your 9th trick, you have to develop clubs - which will involve you losing the lead again ... and they can now cash their spades.
The clubs, on the other hand, will yield four tricks - enough to secure your contract. You lead the ♣J, intending to finesse if West plays low. If that loses, back comes a spade and you do it again. If that works, you have your nine tricks without developing diamonds at all: 2 each in the majors, 4 clubs and the ♦A. OK?
That's all very well, you might say. But what if East holds ♣KQ? Isn't that curtains too? Well, yes it would be, but two observations are in order: (1) Ordinarily, the chance that East has ♣KQ is around 25% *. (2) If we look at the auction (which we always should do!) the chance is actually an even better 0%. How do you know?
What does the auction tell us?
West's takeout X promises - or should promise! - an opening hand. You can count 27 points between you and dummy, leaving just 13 points available for West. OK, maybe she's got a very distributional opening hand with lots of hearts and spades and just 10 points, but that still leaves a maximum of 3 points for East: not enough to hold both the ♣K and ♣Q.
There's further proof of East's weakness in the auction: despite the fact that EW have a fit in both majors, East passes over your partner's raise to 2♦. Surely she'd bid 2♥ or 2♠ if she could. East is clearly as weak as it comes. It's looking pretty likely that nearly all the opps' points - including the two missing Kings - are with West.
So how does it go?
Just stick to the original plan. You lead the ♣J, West covers with the ♣Q ... and you're home! Win with the ♣A, force out the ♣K (it turns out that, as expected, West has that too) and that's all your spade stops gone. Never mind - you have your 9 tricks and all you have to decide is whether you can actually see the ♦K through the back of West's hand. Do you risk the finesse for extra tricks or do you just plump for making your contract?
Take a look at the whole deal. There was just a faint danger that East held the ♦K, but West does have it, so if you take the finesse you're going to take a very impressive 12 tricks. Not bad on a combined 27-point holding.
On the night
On the posh night, 7 of the 10 tables were in 3NT, though (rather surprisingly) three pairs subsided into 3♣ and 3♦. Someone's not counting their points! Anyway, whatever the contract, everyone seems to have had their x-ray glasses on, as only one pair failed to take 12 tricks.
In AP, most were in 3NT, making 9, 10, 11 or 12 tricks.
In conclusion
On this hand - even if EW pass throughout - you want to attack the clubs first, to ensure your 9 tricks. Knowing that West has an opening hand, though, makes her hand transparent: you can be confident that the club suit will behave kindly and you can be pretty sure that the ♦K will be with West as well.
cj
* With both the ♣K and ♣Q missing, there's a 50% chance of each being with West or East. That gives us four possibilities: (1) West has ♣KQ (2) West has ♣K and East has ♣Q (3) West has ♣Q and East has ♣K and (4) East has ♣KQ. You're only going to lose 2 club tricks in case 4. That's just a 1 in 4 chance, or 25%
|
|
|
|
| Board 05 Wed 16 April 2025 |
Show Detail |
Worth the risk?
You overcalled 1♠ over North's opening 1♣ and when your partner freely supported your suit after South's jump to 3♣, you punted 4♠. Which looks like pretty good bidding by you both: just 24 points between you, but a couple of 7-loser hands and a strong 8-card spade fit - solid from the ♠A down to the ♠9.
South leads the ♣5, North winning with the ♣J (!) and North now switches to the ♥6.You win the trick with your ♥A and these two questions spring to mind:
- Can you be 100% sure of 10 tricks? If so, how do you play it?
- Are there chances to make extra tricks? If so, do they involve extra risk?
Question 1 Yes, you can. You have 5 trump tricks, 3 heart tricks, the ♦A and a club ruff in dummy. You have to take the club ruff before you clear trumps, so do that now (if you want to be flashy, ruff with the ♠A!), then clear trumps, using 5 rounds if necessary. Then cash the ♥Q, cross to dummy with the ♦A and cash the ♥K. If you're lucky enough to find the hearts 3-3, dummy's remaining hearts will all be masters and you'll end up with 12 tricks.
Question 2 This being Pairs, overtricks are important, so it's a sensible question. Most players will know that a 3-3 heart split isn't that likely (it's around 36%), but that the split will be no worse than 4-2 a much more likely 85% of the time. This suggests an alternative strategy that's well worth a try: cash your ♥Q, then go out to dummy (with that club ruff) and ruff a heart (high!) in hand before clearing trumps, then (as before) going out to dummy with the ♦A and cashing your two heart winners. Only 11 tricks but that's a clear improvement on the likely 10 'certain' tricks. Is there any extra risk? Yes, there is. If the spades are split 5-0 (unlikely) you now won't be able to clear them, as you've used a long trump to ruff a heart. And if the hearts are split 5-1 (also unlikely) you're not going to make a trick with your ♥Q.
So which way are you going to run? 10 sure tricks (with an outside chance of 12)? Or 11 very likely tricks (with an outside chance of going off)? Up to you!
How does it go?
Take a look at the whole deal. It turns out that option 1 - the safe but dull one! - is the that wins on this deal. The hearts are 5-1 (which is of course why North chose to switch to a heart at trick 2 instead of leading his singleton diamond), so if you choose option 2 and cash your ♥Q, South will ruff it, thus taking you one off.
Which is not to say that option 2 is 'wrong' ...
On the night
On the posh night, some EW pairs stopped in 3♠ but there were a couple in 4♠. Interestingly, only one pair made 10 tricks, the others making just 9. With 10 tricks being a doddle, that suggests that they deliberately chose the more risky strategy in search of the extra trick. Unless, of course, they just forgot to get in the club ruff before they cleared trumps!
In AP, on the other hand, of the five pairs that were in 3♠ or 4♠, four made 10 tricks. A great result on this hand.
In conclusion
Which is the better line for declarer? The results suggest that most of the 'better' players felt the risk was worthwhile: in around 80% of cases, certainly, the spades won't be worse than 4-1 and the hearts won't be worse than 4-2, making cashing the heart worth the risk. But on a hand where not everyone will be in game, there's a lot to be said for taking a rock-solid line with a 100% chance of making your contract. Don't, as they say, look a gift horse in the mouth.
cj
|
|
|
|
| Board 05 Wed 09 April 2025 |
Show Detail |
Once in a blue moon ...
Here's a hand which shows the lengths a bidding system will go to to find a major fit after a NT opening bid. It's a topic we haven't covered yet in our Basic Bidding Themes (coming soon!) so we'll take it a step at a time. For the moment, ignore the hand above and imagine the ♠3 has morphed into a heart, as shown below:
 Your partner's opening 2NT promises 20-22 points, so you know you have enough points for game - but which game? If partner has 4 spades you'll want to be in 4♠ and if she's got 3+ hearts you'll want to be in 4♥. Only if you don't have a major fit will you want to settle for 3NT. How to find out? Your partner's opening 2NT promises 20-22 points, so you know you have enough points for game - but which game? If partner has 4 spades you'll want to be in 4♠ and if she's got 3+ hearts you'll want to be in 4♥. Only if you don't have a major fit will you want to settle for 3NT. How to find out?
Using transfers it's easy: you transfer partner into hearts (you bid 3♦ and she has to respond 3♥) - and then you bid 3♠. Partner now knows that you have 5 hearts and 4 spades and, depending on her holding, can bid 4♥, 4♠ or 3NT.
What about today's proper hand, the one at the top? Let's try it and see what happens: first transfer partner into spades (you bid 3♥ and she has to respond 3♠) - and then you bid 4♥. Partner now knows that you have 5 spades and 4 hearts and can bid 4♥, 4♠ or ... Oops - problem. The bidding's taken you above 3NT, so if you haven't got a major fit, you're stuck: you can no longer play in 3NT. Back to the drawing board!
The solution's turns out to be simplicity itself. Because you're playing transfers, you actually don't ever need to use 3♠ as a response to an opening 2NT. It's a meaningless bid searching for a meaning. So let's give it one and use it to solve the problem we've just identified: responding 3♠ to partner's opening 2NT promises enough points for game, and exactly 4 hearts and 5 spades. And this time, if there's no major fit, partner can sign off in 3NT.
How does it go?
Take a look at the whole deal. It turns out that while you don't have a spade fit, you do have a 4-4 heart fit, so partner will bid 4♥, which is worth 11 tricks (a single spade ruff sets up your spades for discards in the minor suits). 3NT, on the other hand, is worth only 10 tricks.
Note that with this particular holding, you could have gone the transfer-to-spades-then-bid-hearts route, as you have the heart fit, but another day you'll be glad you responded 3♠.
On the night
On the posh night, four pairs were in 4♥, mostly making at least 11 tricks. Three were in 3NT, making just 9 tricks, and a couple found themselves in 4♠ (+1) and 6♠ (-3),
In AP, most NS pairs were in hearts - one even punting an unsuccessful 6♥. Just one ended up in 3NT, and went 1 off.
In conclusion
You won't be using this convention every Wednesday morning, but it should crop up a bit more often than a blue moon (which happens every 2-3 years, according to Google). Meanwhile, it's a reminder of the importance of seeking a major fit.
cj
|
|
|
|
| Board 05 Wed 02 April 2025 |
Show Detail |
Be alert!
It's easy to lose interest when the opps are in a game contract and you have a rubbish hand like East's. You don't even have to choose an opening lead ...
But before we get on to the play, what does the auction tell us?
After South's opening 1♦, ...
- your partner's 1♠ overcall promises 5+ (decent?) spades. Plus at least 8 points.
- What about North's double? This is one of the competitive auction's handiest (and easiest overlooked!) bids: the negative double, * in this case showing her heart suit ('I would have said 1♥ if they hadn't interrupted, partner.')
- Your 2♠ is just to get in the way. It's one of those weak bidding-to-the-level-of-your-fit raises, promising exactly 3 spades (5 + 3 = 8) and not much else. Just as well!
- South's 3NT bid, by contrast, is strong. She's saying that even if partner's only got the minimum 6 points, they've got enough for game in 3NT. She must have 19ish points, then.
OK. Let's play ...
How does it go?
Your partner leads the ♠5, down goes dummy and you dutifully go up with your ♠Q, South winning the trick with the ♠A. That's half your points gone already!
South now leads the ♦A, your partner following with the 10, and then cashes the ♦K, your partner now showing out. And now yet another Ace: the ♣A, followed by a small club, dummy beating partner's ♣J with the ♣K, and then a third club round to partner's ♣Q ...
Ooh - we've finally taken a trick! Sure, but as you started with just one club, you've just had to make a couple of discards. Which cards did you throw?
The answer should be anything but a diamond. If you were counting, you'll know that declarer started with ♦AKQJx, and that once partner's ♦10 has dropped, your ♦9 is bigger than declarer's little ♦x! Unless you've already discarded one of your 'useless' little diamonds, of course, in which case your ♦9 will drop harmlessly under declarer's ♦J, giving her an extra (and undeserved!) trick.
Declarer's plan
Take a look at the whole deal. ** You can see what declarer has in mind. She has the ♥A and a second spade stop, so she's quite safe to set up tricks in other suits. But to start with, she decides just to check that the diamonds are splitting nicely - which she quickly finds they aren't! Undeterred, she switches to clubs to set up an extra trick there, and will be keeping an eagle eye on your discards - if she sees a diamond, she'll be sure to be cashing that extra diamond trick with her ♦3 ... So make sure you throw spades and hearts on those club tricks - hold on to your diamonds for dear life.
On the night
On the posh night, most Souths were in 3NT and most got a small spade lead - but only 3 were kept to 9 tricks. Another 3 made 10 tricks - and yet another 3 made 11! Maybe some Easts had one eye on the footie while playing on BBO ...
In AP, no one made more than 9 tricks (though in one case that was entirely my fault!). Mind you, to have a chance of 10 tricks, South has to attack the clubs while she's still safe in all the suits, so that might have had something to do with it.
In conclusion
Don't fall asleep or 'just follow suit' when defending, however feeble your holding. You never know ...
cj
* When partner opens 1 of a suit and the opps overcall, a double from you promises enough points to respond (ie at least 6, maybe lots more!) and at least 4 cards in any unbid major.
** Have to say that I don't think much of West's 1♠ overcall. Rubbish suit with no texture.
|
|
|
|
| Board 03 Wed 26 March 2025 |
Show Detail |
Don't ... !
This one's as old as the hills, but it's worth a quick reprise.
When partner overcalls South's opening 1♠ with 2♣, North responds 2♥. You haven't got much, but with 4 clubs (and therefore at least 9 clubs between you) you raise partner 'to the level of your fit': 3♣. South now bids 3♥ and they end up in 4♥.
It's your lead, but before we get there, what do you make of the opps' bidding? Well, North's 2♥ puts her with at least five hearts and a pretty pointy hand: with only 4 and/or fewer than 10 points, she'd have shown her hearts with a negative double instead. South therefore, has at least 3 hearts but only an ordinary opening hand, as she didn't raise her partner directly to game. And North's 4♥ suggests that she has that 'extra bit' over and above her promised 10 points to make her worth game.
OK. On to the play ...
It's your lead
What do you fancy? Most players will plump for partner's suit: the ♣5 (your lowest club, promising an honour). It's not going to net you lots of tricks, as the opps have a maximum of 4 clubs between them, maybe fewer - but it's worth a shot.
What alternatives are there? A spade is possible, leading 'through dummy's strength' - again, your lowest, promising an honour: the ♠5. A heart might be OK, but if partner happens to have a heart honour, you'll be finessing it. Neither seems particularly attractive.
Or maybe a diamond. I don't think I'd want to lead a diamond in preference to a club, but if you do choose to lead one, which is the card to lead?
Correct: the Ace. Not the ♦4, 'promising an honour'. Why not? Because NS have a lot more points than you guys, and therefore are much more likely to hold the ♦K than your partner. And if they do, they're going to win trick 1 and go about their ruthless business of stripping you of your trumps and discarding their losers ... So if you don't lead your Ace you may never make a trick with it at all. Hence the golden rule:
Don't lead away from an Ace against a suit contract.
What happens if you do?
It's not great. Take a look at the whole deal ...
Declarer wins trick 1 with dummy's singleton ♦K, then clears trumps, cashes her ♠KQ, pops over to dummy with a diamond ruff and discards all her remaining diamonds and clubs on dummy's spade winners. That's all 13 tricks. Ouch!
If you lead a club instead, they probably still make 12 tricks *, but at least you make the ♣A. And as it happens, the ♦A (rather than the ♦4!) is the best lead you can make, as you can now switch to a club and keep declarer to just 11 tricks.
On the night
On the posh night, most Easts led a club. One led a a trump, and just one led the ♦4, conceding 13 tricks.
In AP, only one East led a club (maybe partner hadn't overcalled 2♣?). All the others led a diamond. One led the ♦A, for a great score. But the other three all led a small diamond, with the result we've seen.
In conclusion
- This golden rule only applies to suit contracts. Against a no trump contract, you'd be absolutely correct to lead your ♦4, hoping to set up a few diamond tricks for later. In no trumps contracts, declarers can't ruff your winners. But they can in suit contracts, so beware!
- With 6 clubs and shortages in both the opps' suits, West should consider whether it might be worth sacrificing in 5♣. At any other vulnerability I think it would, but vulnerable against non-vulnerable, you can only afford to go one off doubled, so it's too dangerous. Sure, as the cards lie, they can make 10 tricks provided they drop South's ♦K under East's Ace, but the correct play would be the diamond finesse, so that would be two off for -500 - too much. Though even that's better than the 510 NS will get if East leads the ♦4!
cj
* Unless West works out that declarer probably has only one club and switches to a diamond at trick 2.
|
|
|
|
| Board 06 Wed 19 March 2025 |
Show Detail |
Small or grand?
Here's a nice situation: your partner opens the bidding and you've got a balanced 18 points. You're clearly going to be in game - and very probably beyond, as you probably have at least 30 points between you - but in what denomination remains to be seen. Take a look at the auction thus far: how do you interpret it?
- Partner 1♥: The opening bid, so pretty wide open.
- You 1♠: A classic instance of the 'don't jump' mantra in action. Sure you're strong, but so far you have only the sketchiest idea of what your partner holds: it could be anything from a good 10 to a lousy 20, and it's her next bid that will tell you. So just bid your suit and wait and see ...
- Partner 4♠: Goodness! As far as partner's concerned you might only have 6 points, yet she's strong enough to raise you to game. Sure, her raise might be points-light and based on a distributional 5-loser hand, but still ...
- You 4NT: Slams are all about making lots of tricks, but they're also all about not losing more than one trick, so controls are all-important. You're particularly interested in whether partner holds the two red Aces and the trump King - the three missing 'keycards' - and RKC Blackwood is one way to find out. *
- Partner 5♣: She's telling you that she has either three or none. With none, she'd be hard pressed to open, let alone raise you to game, so three it must be. What now?
- You 5NT: When you have all the key cards, you have to be wondering whether the grand slam might be on. What card might be crucial for that? The ♦K. 5NT is Blackwood again, but this time asking for Kings ...
- Partner 6♦: ... and partner has it. (Well, she has one in addition to the trump King, and you have the other two ...)
So the question is, what's your final bid? 6♠, 6NT, 7♠ or 7NT?
Make your decision and we'll peek at what they bid on the posh night ...
On the night
On the posh night, two were in 6♠, two were in 6NT, two were in 7NT ... and two stopped in 5♠ (Why? My guess is that they misinterpreted partner's 5♣ as zero keycards instead of 3, but that's just my guess.)
In AP, those that called for help ended up in 6♠ and those that didn't played in 4♠.
Interestingly, no one was in what I think I would have bid, which is 7♠: the grand slam seems a great idea but there might just be the need for a ruff in hand or dummy for the 13th trick.
How does it go?
Take a look at the whole deal. You have 13 tricks off the top in either spades or NT, making 7NT the best place to be - the extra 10 points consigns 7♠ to 2nd place. You have 4 spade tricks, 3 heart tricks, 4 diamond tricks and 2 club tricks. No finessing, inferences or guesswork required. All that's required is that you play your tricks in a sensible order so that you don't get stuck in the wrong hand later on in the play.
An excellent example, therefore, of a claim: forcing the opps to follow suit as you bang out winner after winner would not only be like watching paint dry, but also an insult to their intelligence as well as yours. You're holding all the cards (Trumps and all, ho ho) so no need to play any: just lay them on the table and announce that you have 13 tricks.
cj
* Actually, it's not ideal, because of your weak diamond suit. If partner shows just two keycards, and the missing one is the ♦A, the opps might have the ♦AK off the top, which would take you off in 6♠. On the hand, partner must be pretty strong for her bid, so she's very unlikely to be missing both the ♦A and the ♦K.
|
|
|
|
| Board 10 Wed 12 March 2025 |
Show Detail |
The buck stops here
Here's a hand from last week that features in the latest basic bidding email * and is worth a further look, as it illustrates a trap for the inexperienced bidder.
Your partner opens 1♣, you respond 1♦ (bidding your 4-card suits 'up the line') and partner now bids 1♥, showing at least 5-4 in clubs and hearts. You've painlessly found your fit - hearts. What's your next bid?
For the unwary, it's tempting to raise to 2♥ to agree the suit and 'see what happens next'. Well, what'll happen next if partner has an 'ordinary' opening hand is she'll pass and your final contract will be 2♥. The same goes for 3♥: this would mean 'I've got a bit extra (10 points rather than 6, say). What about you, partner?' and if partner doesn't have 'a bit extra' she'll again pass.
The situation is that your partner has an opening hand with four hearts and so do you. You already know that you're in game and you already know that you have a major fit. And since you already know what the final contract should be, it's up to you to bid it: 4♥. The buck stops with you - don't pass it to your partner.
How does it go?
OK. We're in 4♥ by East and South leads the ♥4. What are your thoughts?
An initial thought might be 'Why did she lead a trump?' To which the answer is (probably): when the opps settle in a suit which is the 2nd suit for both of them (East bid ♣ first and West bid ♦ first) they've probably got shortages in each other's first suits and so might be cross-ruffing. And the best way of preventing a cross-ruff by declarer is to lead trumps whenever you can.
A pity, since you'd like to be ruffing a diamond or two in hand before clearing trumps, but there you are. As it happens, North wins with the ♥A but instead of continuing with trumps, leads back the ♣6 - a singleton?
Back to Plan A. Win the club, over to dummy's ♠K, ruff a diamond, back to dummy with the ♠Q (noticing that North drops the ♠J, thus making dummy's ♠10 worth a trick), ruff another diamond. Now clear the rest of their trumps, concede a trick to South's ♣Q and the rest of the tricks are yours. Take a look at the whole deal.
On the night
On the posh night, almost everyone was in 4♥, though curiously mostly played by West, rather than East - see below. Tricks taken ranged all the way from 9 up to 12 tricks!
In AP, everyone was in 4♥ (well done), though again mostly by West. The tricks again ranged from 9 right up to 12.
An alternative auction
A lot of more experienced players sitting West will ignore the 4-card diamond suit in favour of the major, and that's obviously what happened here: if West responds 1♥ immediately, the fit's found one bid earlier and it'll be up to East to decide how high to go. She only has 12 points, which would suggest a raise to just 2♥, but she also has just 6 losers, so might prefer to invite game with 3♥. In either case, West, with 13 points opposite an opening hand, will raise to game.
I don't really like the idea of missing out the diamonds. You're never going to miss a major fit anyway, as with 4 hearts opener will now bid hearts over your 1♦ - as in our original auction - and your diamond bid might have its own advantages. For one thing, on this hand it deters North from coming in with her own preemptive diamond bid **. And for another, if we should end up in no trumps, it might deter the opps from leading a diamond - which might be their best chance at a 'killer lead'. But each to his own!
cj
* Basic Bidding Theme 5: What's the auction all about?
** What if North does come in with a preemptive 3♦ after 1♣ - 1♥ ? As it happens, it doesn't hurt any, as East's planning to say 3♥ anyway. It also tells declarer that if North holds long diamonds, the missing clubs are likely to be held by South - and once trumps are cleared a low club towards dummy's ♣Jx is a good way of limiting the opps' club tricks to just one.
|
|
|
|
| Board 09 Wed 05 March 2025 |
Show Detail |
One throw of the dice
What are you bidding sitting South on this hand in response to partner's opening 1NT? I'm raising straight to 3NT. I've got enough points for game, together with a long suit I might be able to set up plus entries to get to it. Sure, we might make 5♣, but if we can then surely we can make 3NT as well - maybe with overtricks. In other words, it's the usual story: with a minor fit, go for NT, and only settle for the minor as a last resort or if you've got a slam on (which you won't have here with just 26 points between you).
More on the auction later. Meanwhile, you're now sitting North in 3NT and East leads the ♥J. Plan your play.
Just the one chance
Hmm. Looks as if the opps have found the right opening lead. Right. How many tricks have we got?
We have eight tricks: 6 clubs and the ♥A and ♠A. Where's the 9th coming from?
Well, once you come in with your ♥A (which you will very soon!), you can easily set up a trick in diamonds by leading the ♦K. The trouble is, you'll be off before you get the lead back again. The opps will win with the ♦A and cash all their heart winners. No good - you simply can't afford to lose the lead.
Which only leaves spades: your only chance of bringing this contract home is if you lead a spade towards dummy's ♠AQ and if East holds the ♠K.
Playing it out
So exactly how do you play it?
OK. You've won with your ♥A, either at trick 1 or 2 - you can hold up if you like, but it won't help unless the hearts are split 7-2: unlikely, on the auction you've just had. What happens next?
You lead a little spade. Right away, at trick 2. It's very tempting to cash all those lovely clubs first, isn't it, just to get them under your belt and make you feel a bit more secure. The trouble is (again!) that it's a sure route to disaster: once the last club is played, you can't take the spade finesse because you have no entries left to your hand. You'll be leading away from your ♠AQ instead of towards them.
Which is why you have to cross your fingers and take the spade finesse as soon as you get the lead. Sure, if the ♠K is with West, you're down. But it's the only chance you've got - and as it happens it comes off, as you'll see if you take a look at the whole deal.
On the night
On the posh night, 5 pairs were in 3NT, all getting the ♥J lead, and just three making. (Guess who didn't lead a spade at trick 2, then?). Two others were in 3♣ and one in 5♣ - which somehow made although it should go 1 off.
In AP, no one bid 3NT. Most were in 3♣ and one was in 5♣, again somehow making.
Back to the auction ...
As a raise to 3NT is a no-brainer, how come so few people were in it? Probably because East overcalls 2♥. This makes life rather more difficult for South. She has game-going points but nothing in hearts, so you can see why she might want to bid 3♣.
A better bid would be 3♥. Huh? Well, actually, there's only one thing it can mean. You're obviously looking for a NT contract, so 3♥ must mean 'Hey partner, I want to be in 3NT but I'm worried about the hearts. Have you got a stop?' And with the ♥A, North will bid 3NT. Without a heart stop, she'd have to bid something else, and you'll probably end up in 4♣ or 5♣.
3♣, on the other hand, is weaker. It means something like 'I've got some points here and a nice club suit and I don't think they should be getting away with being in 2♥.' Which is why so many pairs ended up in 3♣.
The 3♥ cue-bid isn't 'basic bidding', sure, but as it can't be natural, it just has to be asking partner for a stop.
cj
|
|
|
|
| Board 13 Wed 26 Feb 2025 |
Show Detail |
A declarer's best friend
Here's a nice auction which exemplifies some of the basic bidding features we've been looking at recently:
West 1♥ A balanced hand with too many points to open 1NT. With 4-4 in hearts and spades, open 1♥, not 1♠.
East 2♦ With 11 points, East is strong enough to show her suit at the 2 level.
West 2NT Now's the time to rebid NT, showing a balanced 15+ points. Note that both players are now committed to bidding game: 15+ added to 10+ comes to 25+.
East 3♥ East is aware that partner might well have 5 hearts, in which case 4♥ will be the best contract. So instead of simply raising to 3NT, she tests the water: 'I've got 3 hearts, p, just in case you have 5.'
West 3NT Nah, I've only got 4. But thanks for asking.
North leads the ♣4 ...
Planning the play
... and before you play any cards, you need to plan your play. How many tricks do you have? How many more do you need? And where it is / are they coming from?
- You have 8 tricks: 2 clubs, 4 hearts and 2 spades. So you need one more trick.
- You might be able to generate this if the opps' spades are split 3-3: then your 4th spade will be worth a trick. The problem with that is that the odds are only around 35%. Not great.
- Diamonds are a better bet. You'll have to give them tricks with the ♦A and ♦K, but if the ♦10 drops (or if you can finesse against it) you can generate your 9th trick. The chances are better than 50%.
An unavoidable risk
OK. But even if the diamonds work out OK, there's a risk, isn't there? Can you see it?
Well, when you lose your first diamond trick, they're going to return another club. That's your club stops gone. Then when they win their 2nd diamond trick, they can take their club winners. OK. So you have to hope that the opps' clubs are split 4-4. That way you're only losing 2 diamonds and 2 clubs. But if the clubs are 5-3, you're losing three club tricks: one too many. But there's nothing to be done: you have to hope for the best and get on with it.
So let's start playing. You duck the first club, South winning with the ♣Q, and win the club continuation. Now for the diamonds.
Playing the diamonds
How do you play them? The best plan seems to be to start with a low diamond from dummy towards the ♦Qx. If South is daft enough to rise with the ♦K or ♦A that's your diamond trick set up. If not, you can try a finesse the next time you have the lead: a low diamond from your hand towards dummy's ♦J9, hoping for the best.
Let's try it: First you have to get out to dummy to lead the small diamond. How? Lead a heart. Sure, you have ♠AK in dummy, but if you take that route, they may change their plan in midstream and lead back a spade, causing you all sorts of problems. In hearts, however, you have four stops, not just two! So ...
- Lead a low heart to dummy's ♥K.
- Lead a low diamond to the ♦Q. North wins with the ♦K and leads a club. That's your last club gone.
- Now lead your ♦5 ... and as luck would have it, the ♦10 appears from North. Lovely. You cover with the ♦J, South's ♦A wins the trick ... and your ♦9 is now the top diamond. Phew.
Now the opps can cash their clubs ... but it turns out that the clubs were 4-4, so they get their 2nd club trick and you get the rest. 3NT bid and made. Take a look at the whole deal.
On the night
On the posh night, everyone was in 3NT. Just one went off, three made 9 tricks (as we just did) and the other 4 somehow (see below!) all made overtricks.
In AP, most declarers were in 3NT (though 2 managed to end up in hearts). Two made overtricks, but three declarers went one off.
Points to take from this hand
- The opening lead. Sure, North's got a nice sequence of 5 hearts, but EW have seven, probably including all the top honours, so leading a heart's a waste of time. What happens if they lead a heart is that you can set up your diamonds without running out of club stops, and end up with a very pleasant 11 tricks.
- It's worth holding up on the first club trick in case the clubs are 5-3. You never know. If South holds ♦AK and has only 3 clubs, they'll never be able to make their club tricks. Even if the top diamonds are split, the opps may misplay it and get stuck in the wrong hand.
- In the auction, East does well to bid 3♥: if partner does have 5 hearts, then you want to be in the suit rather than 3NT.
cj
|
|
|
|
| Board 04 Wed 19 Feb 2025 |
Show Detail |
Responder in ?Wonder?land
9-card suits don't come up very often, but they've been getting a bit London-bus-like in recent weeks. On this hand you're obviously going to intervene (especially after your partner's opening pass) - but how high should you go? 2♣? 3♣? 4♣? 5♣? And how do you decide?
There are two things to guide you: the length of your suit and a peek at the vulnerability.
The level of a preempt is related to the suit length, 6 being suitable for a weak two, 7 a weak three ... and so the default opening bid (or jump overcall) for a 9-card suit is at the five level. The word 'default' would suggest equal vulnerability, so that at 'favourable vulnerability' (ie they're vulnerable and you aren't) you might risk going one higher, and at 'unfavourable vulnerability' (ie you're vulnerable and they aren't) you might decide to go one lower. the equal vulnerability would suggest that on this hand, you should go straight to 5♣. *
Note the straight to 5♣. This stops the opps from having further sensible conversation. South's now stuck in a 'Wonderland', where all she can do is wonder what to do next and take a guess - as you'll see if you take a look at the whole deal.
South's choices
Your 5♣ will have given South a bit of a jolt - as well as a difficult choice. Fortunately for NS, they at least know about their major fit, and South has to decide whether to punt 5♠ or X for penalties:
- The X is an easy option. South has 15 points (including ♣Kx, which must be worth a trick) opposite an opening hand. It's pretty certain that East isn't making 5♣.
- But can you make 5♠? This is less sure. You could easily be missing the ♥AK as well as the ♣A ... but on the other hand, partner might be void in clubs or have the heart honours herself. You simply don't know.
Add to this the fact that if you can get East three off in 5♣X that'll be worth 800 - more than making 5♠. Most Souths will surely prefer to double than to risk bidding on.
What happens?
- 5♣ goes just 2 off, for a penalty of 500 points if doubled.
- 5♠ makes, thanks to some fancy footwork by declarer in setting up the hearts, and is worth 650.
Which means that East's 5♣ bid is great value for money: it gives EW a good chance of getting away with just -500 instead of the 650 that NS would otherwise score.
On the night
My prediction turns out to be wrong: on the posh night, all but one of the Souths faced with the choice plumped for 5♠, and with one exception made it. (Two were allowed by rather flaccid Easts to get away with bidding just 4♠.)
In AP, 3 were in spades (two making), 3 were in 5♣X-2 and one was in an extraordinary 3NTX+1, for a score of 950.
cj
* Here's an easily remembered guide to sacrifices and vulnerability:
- At unfavourable vulnerability, you can only afford to go ONE off doubled ...
- At equal vulnerability, you can afford to go TWO off doubled ...
- At favourable vulnerability you can afford to go THREE off doubled ...
... compared to what you'd lose if you let them make their game.
|
|
|
|
| Board 03 Wed 12 Feb 2025 |
Show Detail |
Child's play
This is another of those 'strong unbalanced' opening hands like last week's HOTW. On this one, sitting South, you decide to open just 1♠ (on the grounds that if partner's too weak to respond you probably haven't got game anyway). In the event, she responds 2♦, and it's child's play to find 4♠.
West leads the ♦7, down goes dummy and ...
... it's time to plan your play
It's looking pretty good, isn't it - so good, in fact, that you're regretting not making a slam try. Never mind, you are where you are. What to do?
The first question facing you is whether to go up with your ♦A or whether to take the 'free' finesse and play low. Each has its pros and cons - playing low is great if West holds the ♦K (unlikely!) and OK if the 7♦'s a doubleton, but if it's a singleton they'll be getting a diamond ruff. Going up with the ♦A stops their ruff, but uses up your only certain entry to dummy.
But the crucial question is the one that all declarers in suit contracts must ask as soon as they see dummy:
Is there any reason why I shouldn't clear trumps at the first opportunity?
The answer here is a resounding 'no': you have plenty of tricks in all three side suits and no reason at all to leave trumps till later.
Why is this so important? Well, let's see what happens when you don't clear trumps ...
You decide to play low to trick one. East wins with the ♦K and leads back a low diamond, which West ruffs. Two tricks to the bad guys. East leads back a small heart, which you win with dummy's ♥10. This is the crunch time: you have the lead and your first chance to clear trumps. OK. Let's say you don't - say you decide to cash a second heart winner instead.
To see what happens, take a look at the whole deal:
- East ruffs and leads a diamond
- West ruffs and leads another heart
- East ruffs and leads her last diamond
- West ruffs ... and you're three off. The opps have won a trick with each of their 5 little trumps.
Rewind
Let's go back to trick 3 and try again - you've just won your first trick with ♥A. Cash your ♠AKQ and the opps have no trumps left - and you have nothing left but winners. The top two diamonds, the top three hearts and two more trumps.
When you're in a suit contract, you don't want the opps to be ruffing your tricks - you want to be ruffing theirs. So get rid of their trumps asap. It's child's play, really - and the alternative can be a nightmare!
On the night
Everyone on the posh night made 10, 11 or 12 (yes, you can make 12, but you have to be pretty devious to do it). In AP, most made 11 or 12 tricks but a couple of declarers went off, and the only way that can have happened is that they didn't clear trumps.
cj
* Your rebid is 3♥ - an unconditional game force. Partner now knows that you have at leas 5 spades, so has no problem signing off in 4♠.
|
|
|
|
| Board 09 Wed 05 Feb 2025 |
Show Detail |
The right shape?
What do you open with this hand? A lot of players will open 2NT: 6-3-3-1 isn't exactly a NT shape, they'll agree, but the long suit is a minor and you have the points - as well as a stop in your singleton suit.
Personally I don't like opening 2NT with a singleton, even if it's an Ace: the opps are likely to lead the suit (they've probably got more of it than any other suit) and there's your stop gone at trick one. There's another reason, which we'll come to, but for now, if you don't open 2NT, what to open instead?
The usual answer is just to open 1 of a suit - in this case 1♦. But what if partner passes? Well, if partner's really too weak to respond, you probably haven't got game on anyway, so no problem.
But this hand's so strong - only needing the ♦Q or a successful diamond finesse for 3NT to be on - that I think it's worth a 2♣ opening. *
Say you open 2♣.
- Over partner's 2♦ response *, you bid 3♦, telling partner you have a strong unbalanced hand worth 9 tricks with diamonds as trumps.
- Partner now bids 3♠, promising a few points (maybe 5+) and a 5+-card spade suit.
- At this point, you can stop worrying about your singleton spade and bid what you wanted to all along: 3NT.
OK. So if the spades are safe, then opening 2NT would have been OK after all, then? Well no, maybe not on this hand ...
Disaster!
Take a look at the whole deal. What's partner going to do if you open 2NT? Well, she's going to think you've got at least 2 spades for your bid, meaning that you have a spade fit. So she'll transfer you into 3♠ (via 3♥) and then raise you to 4♠! Which, as you can see, will usually go off.
3NT, on the other hand, makes 10 tricks. Note that your ♠A on its own isn't enough: that's knocked out at trick one, so you need a second spade stop to keep you safe when you lose the lead to the ♦Q. And it's partner's 3♠ bid over your 3♦ rebid that tells you it's now safe to bid 3NT.
So, how did the more experienced players do on the 'posh' night?
On the night
Just 3 pairs were in NT (including one who punted a very frisky 6NT!). All the rest - 6 pairs - were in 4♠, nearly all going off - which suggests that many (most, even!) experienced players are happy to open 2NT with a singleton. Well, it works some of the time ...
With a bit of help, the AP players did better: all but one pair were in 3NT, mostly making 9 or 10 tricks. The one pair in 4♠ went one off.
cj
* No, 2♣ does not 'promise 23+ points': it promises either a balanced hand with 23+ points or a strong unbalanced hand with 9 'playing tricks' in a suit. It's usual to respond 2♦ (a 'relay' response which has nothing to do with diamonds) to give opener a chance to clarify which kind of hand she has: 2NT to show a balanced 23+ or (here) 3♦ to show 9 playing tricks in diamonds.
|
|
|
|
| Board 07 Wed 29 January 2025 |
Show Detail |
Choose your rebid
With a pleasant 15-count, you open 1♣ and partner responds 1♥, the opponents both passing. What now?
There are three choices, all of which are misleading in one way or another:
- 2♣ Technically the 'correct' bid, but understates your strength a bit. It would be a shame if partner had 10 points and passed, having concluded that game was too unlikely to bother with. *
- 3♣ The 'jump rebid' describes your hand better (16-18 points and a good 6-card suit), but technically you're a point short.
- 1NT Not quite a 'balanced hand', but gets your points spot on.
Any of these choices is kinda OK, but consider our 'holy grail': seek out a major fit; failing that look for no trumps; and only as a last resort settle for a minor suit. The major fit looks unlikely: this would require partner to be holding 6 hearts, so why not go straight for the 2nd best destination: no trumps. 1NT gets my vote. **
As it happens, it doesn't much matter which you choose on this deal. As you'll see if you look at the whole deal, partner has a chunky balanced 13 points, so if you rebid 1NT she's raising you to 3NT. And if you rebid clubs, she's bidding 3NT anyway.
Who rebid what?
On the posh night, everyone was in 3NT, and it's interesting to note that five of the eight declarers were West: meaning that most Wests preferred to rebid 1NT instead of rebidding clubs.
It was a similar story in AP: three of the four 3NT declarers were West.
As always, the trick tally wasn't as good in AP. The posh declarers made 9, 10 or 11 tricks, which in AP, two declarers went one off.
Where are the tricks?
If West's the declarer, North will probably lead the ♥10 (top of the 'sequency' bit of the broken sequence ♥Q109). So where are the tricks coming from? In the event, South wins the trick with the ♥A and returns another heart, which you take with your ♥K. So what's next?
You've got one heart trick (two if they carry on with hearts), three spades and at least one diamond, so you only need 4 more from clubs to make your contract. So attack clubs NOW, while you still have (a) stops in the other suits and (b) entries to your clubs. It's probably simplest to cross your fingers and bang out the ♣AK, and as long as they're 3-2 you've got 10 tricks. You lose a trick to the ♣Q and probably to the ♥Q, and the rest are all yours.
cj
* With 10 points, partner shouldn't pass, as you're by no means denying a 15-count if you rebid 2♣. I have a 'rule of 10', which says that if partner opens and I have 10+ points, I keep the auction going until 2NT. Sometimes you end up getting too high, but on the whole you find yourself missing games a whole lot less.
** If partner does have 6 hearts, you won't miss your fit - she's sure to bid them again.
|
|
|
|
| Board 06 Wed 22 January 2025 |
Show Detail |
Temptation
The shapelier you are, the less you have to worry about point-counts. So when her partner opens 1♠, North's bidding game - even without the 2♦ overcall from West. With a great trump fit, North's hand has just 7 losers - enough for game in itself - and it looks even better after the overcall, as there's a max of just one diamond loser. Add to that a void in hearts and long clubs (a good chance that partner's short in them, then) and 4♠ is a no-brainer. And if you go off, you're not vulnerable - so even if you're two off (-100) that's less expensive than EW making (say) 9 tricks in diamonds for 110.
But you've no intention of going off ...
Making 4♠
West starts off with the ♣AK (everyone following suit) and switches to a low diamond. Sitting South as declarer, are you going to make your contract?
Well, if you play sensibly, the answer's yes. It's pretty well a lay-down. This is the situation:
You have just two possible losers: the ♠K and a diamond trick. Lose both and you're going off. Lose just one and you're home. Lose neither and you're making an overtrick.
OK. How do you get home with pretty much 100% chance of success?
Easy. Simply dump dummy's diamond loser. You win with the ♦A, cross to your hand with the ♠A and lead a heart, discarding dummy's ♦2. You will still lose a trick to the ♠K, of course - unless it was a singleton and dropped under your ♠A - but you can put up with that because you've just made your contract.
Trying for an overtrick
The temptation, of course, is to try for the overtrick. Instead of leading to your ♠A, you take the finesse: play your ♠Q in the hope that East holds the ♠K. If it works, that's lovely: you can dump your ♦2, as planned, catch the ♠K and make 11 tricks.
The trouble is that if it doesn't work - if West holds the ♠K - you're off. She wins a spade trick, leads a diamond and you lose a diamond trick as well.
Which explains (as you'll see if you look at the whole deal) why so many people went off instead of making a comfortable 10 tricks ...
On the night
In AP, apart from one table in 2♦, everyone was in 4♠ by South. Good so far. The downside was that only one of the five declarers made the contract.
On the posh night, everyone was in 4♠ and six out of the eight made it. Two fell for the temptation and made just 9 tricks.
A final thought
There's no suggestion here that declarers went down because they were greedy. It's declarer's job to be greedy! In pairs, an overtrick can make all the difference between a top and a bottom.
So it would, of course, be correct to try the spade finesse if you could afford it. If dummy had, for instance, one club fewer and a singleton heart, you could come over to your hand with a heart, then discard dummy's ♦2, get back to dummy with a diamond ruff and then take the spade finesse. It still loses, but you'd be right to give it a try. Here, though, with no other sure entry to your hand other than the ♠A, it's better to play safe.
cj
|
|
|
|
| Board 15 Wed 15 January 2025 |
Show Detail |
Sacrifice?
9-card suits don't come up very often, so when they do it's as well to make the best you can of them. If the opps have a spade fit (which looks pretty likely from where you're sitting) you want to shove your oar in as high as you can - but how high is that?
Well, think about opening pre-empts. With a 7-card suit you'd open 3♦ and with an 8-card suit 4♦ ... so with a 9-card suit 5♦ looks about right. What's nice about 5♦ is that it forces the opps above their game slot of 4♠, so they're either going to have to stick their necks out and risk 5♠ or else (presumably) double you for penalties. So the next question is:
Can you afford it?
The difficulty is that you're vulnerable and they're not - the worst combination if you're making a sacrifice. They only have to get you two off for a penalty of 500, which is worse than the 420 they get for making 4♠.
On the plus side, though, you have a very nice hand. You have none of their spades - no losers there, then - and will lose a maximum of four tricks: the ♦A, ♣A and possibly two hearts. So partner will have to stump up just one of those tricks to make it all worthwhile.
So do you bid 5♦ or settle for something a bit more modest? Up to you! Let's say you go for it ...
What happens?
Take a look at the whole deal. Partner's hearts are good enough to save you one of those four tricks, anyway. East will probably lead the ♠5 * - her partner's suit. Plan your play.
Well, it's easier if you can see all the hands, but it turns out that you can make your contract. Can you see how?
It's all about the ♣K, isn't it? Once you've got rid of their trumps (which doesn't take long!) you cross your fingers and lead your singleton club towards the ♣K, and whether East takes her Ace or not, you're home. Let's say she does. All you have to do now if get over to dummy, dump a small heart on the ♣K, and, crossing your fingers again, take the heart finesse ... job done!
... Erm. Fine. But how am I supposed to get to dummy? Easy - lead a small trump to dummmy's 10!
So there you are, thinking you're sacrificing in 5♦ to stop them making 4♠ ... and it turns out that you're the one making the contract, while they can't make 4♠ anyway. They're the ones that should be sacrificing in 5♠ to stop you making game.
On the night
On the posh night, three Norths were in 5♦ (two of them doubled) and two of them made 11 tricks. All the others were in 4♠ or 5♠, all going off.
In AP, three Norths were in 5♦ and one was in 6♦ (!): two made 11 but two made just 10. The other two EWs were in spades, both going off.
cj
* NOT the ♠2 or the ♠7. The ♠2 (see last week's HOTW) would be promising an honour (lead low for like), while the ♠7, followed by a lower card on the next spade trick, would be promising a doubleton. The ♠5 is MUD (middle-up-down), which, followed by the ♠7, promises what you've got: three rubbish spades!
|
|
|
|
| Board 05 Wed 08 Jan 2025 |
Show Detail |
Two chances - either will do
Here's a nice hand. I already sent notes about the auction to Wednesday AP players (summarised below) so here we're focusing on the play. It's simple enough: You're sitting North and East leads the ♠6 against your 6NT contract. What are your thoughts?
The first thing to do is to count your tricks, and here you have 11 tricks 'off the top': 3 spades, 4 diamonds and 2 each in hearts and clubs. Where's your 12th trick coming from?
Well, if East has led from the ♠J, you can make an extra spade trick right now, so let's try that before anything else: you play the ♠10 from dummy, but West goes up with the ♠J and you win the trick in hand.
So you're still looking for your 12th trick, which will clearly have to come from hearts or clubs. You hold AKJ in each suit, so the 12th trick will have to come from either the ♣J or the ♥J, How to proceed, then? There are two lines you can try:
No contest
Option 1 Bang out your spades and diamonds and then cash the ♥AK and ♣AK, hoping that one of the Queens will drop, This is pretty unlikely to happen. The chance of a player holding just Qx in either hearts or clubs is less than 10%. So assuming that the defenders aren't daft, this option has around 17% chance of succeeding.
Option 2 Finesse, hoping that the Queen is in the right place. That is, lead a low heart (say) towards the ♥AKJ and play the Jack, crossing your fingers. If it works, you've made your contract. And if it doesn't, try it again in clubs: lead a low club towards the ♣AKJ and play the Jack, again crossing your fingers. The chances of a finesse working are 50% (the Queen might be in either hand), but here you only need one of the two finesses to work to make your contract. That's a 75% chance.
No contest, then. Finessing is almost 5 times as likely to succeed as playing for the drop. Let's try that, then ...
What happens?
You've just won trick one in hand. Lead your small heart and play the Jack. It works - East has the ♥Q. No harm, then, in trying for an overtrick with the club finesse. Lead a low club from dummy and play the Jack: again, it works: West has the ♣Q. You've just made all 13 tricks.
And Option 1? Well, as neither player started out with ♥Qx or ♣Qx (as expected) you end up going one off with just 11 tricks.
So in this case, 'finesse for success'. If that seems a bit obvious, read on ...
On the night
In AP, nearly everyone was in 6NT, but only three made 12 or 13 tricks. The other four - presumably following Option 1 - went one off.
On the posh night, two declarers made 12 tricks and the other 5 all made 13.
When leading: low is for like, high is for hate
We all know about leading the '4th highest of our longest and strongest suit' against NT contracts. But that only applies if the suit has something to offer. The lead of the ♠3 here, then, would promise at least one honour. From a rubbish suit (and the ♠7643 is just that!) you should lead the 2nd highest: the ♠6. Please take note if you were one of the Easts that led the ♠3. Leading low from an honour and high from rubbish is a great way of telling partner what you have and haven't got.
A note on the auction
- 1♦: Sure, you've got 20 points, but I don't like opening 2NT with a singleton (especially a small one!) so I make a standard opening bid and hope partner doesn't pass.
- 1♥: sure, you're strong, but first things first: show your longest suit and see what partner says next: it's opener's 2nd bid that really puts you in the picture.
- 3NT: you're pretty sure that NT is where you want to be, but you're too strong to rebid 1NT (15-16) or 2NT (17-18), either of which can be passed. To be sure, go straight to game.
- 6NT: you now know that partner has at least 19 points. Add that to your 15 and that's enough for the small slam: go straight there!
cj
|
|
|
|